|
The Autoscheduler is designed to fill service/shifts duties in your schedule. It can
space assignments, balance workloads, and ensure that different days of the week are
distributed evenly, all while accounting for FTE%, targets, staff work preferences,
rules, and call patterns.
Before autoscheduling, make sure your rules, patterns, and staff work preferences
are in place:
Instructions
WATCH video tutorial here.
- Open the Autoscheduler window. Go to the Window menu and select
Autoscheduler...
<
- You may autoscheduler select services/shifts individually or enable the Fill
sibling rows feature which autofills all "sibling" services/shifts at once. (Note:
if you do not see the "Fill sibling rows" option on your Autoscheduler window,
you'll need to update
your copy of OnCall to a build date of April 2020 or newer).
- If you autofill by individual service/shift, select a service/shift
on left-hand side of your schedule you want to fill first. This enables you flexibility
on which services you want to autofill vs manually fill. It also provides you freedom
to change the Autoscheduler settings on how to fill the services based on your service
needs.
- If you want to autofill by enabling Fill sibling rows, you'll need to first create
an Autoschedule order rule using the Rule Writer.
Check the "Fill sibling rows" box, then to the right, click with rule...". The Rule Writer window appears. Select the services/shifts you want filled all at once. This designates them as "Sibling
rows." Close the Rule writer window.
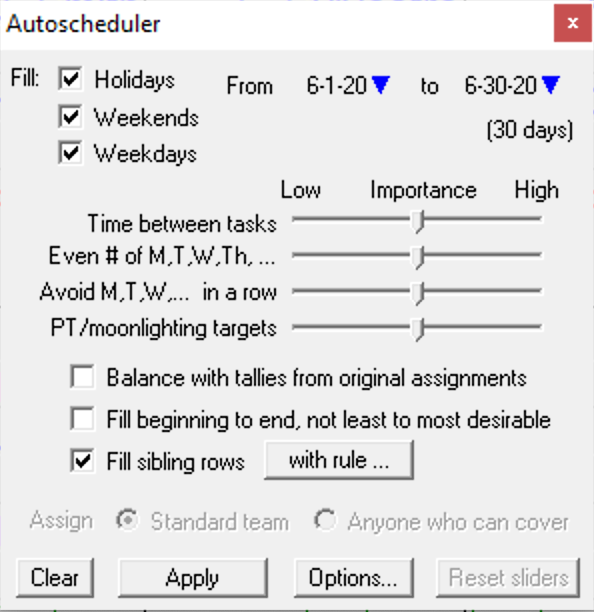
- At the top left corner of the Autoscheduler window, choose which days of the week to fill: Holidays, Weekends, and/or Weekdays. For example, if you'd rather schedule holidays manually, uncheck Holidays.
- At the top right corner, select a range of dates you want to fill using From and to.
- Check your fill preferences outlined on the Autoscheduler window and adjust if applicable. If you have a Can-cover rule established, you may choose to have the Autoscheduler fill standard team or anyone that can cover. Learn more about Can-cover rules.
- At the bottom of the Autoscheduler window, select Options... In the Preferences window, select the options that fit your needs for filling the selected service. Then click OK to close the window.

- Click Apply to fill. If you have manually entered assignments, the Autoscheduler will fill around them. To undo what you filled, click Clear. However, if you clear the assignments filled, both the autofilled and manually entered assignments clear. Note: You may lock the manually entered assignments before autofilling, in case you need to clear afterward. To lock, right-click on an assignment cell or a group of cells. In the menu, select "Lock
assignments."
- Schedules built manually or using the Autoscheduler window typically need some fine-tuning. Many groups look at the Statistics page (tally report)
 to ensure fairness, and then manually tweak the tally report or adjust a few assignments in their schedule to improve the balance. In addition, when trying to balance workloads and avoid conflicts, the Autoscheduler ignores services that aren't included in the tally report. to ensure fairness, and then manually tweak the tally report or adjust a few assignments in their schedule to improve the balance. In addition, when trying to balance workloads and avoid conflicts, the Autoscheduler ignores services that aren't included in the tally report.
Here we discuss autopopulate.
This page describes populate.
|
|