|
Keep your staff's contact information in OnCall, list the call directory online at
Amion, and enable paging and texting at Amion to streamline communication with your
staff.
There are two methods to enter contact information in OnCall, Amion's desktop application.
Choose one method or a combination of both.
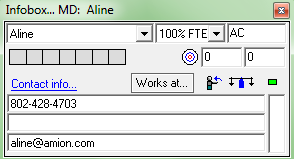
Basic information - use the Infobox:
Enter up to two contact numbers and one email address.
- For attending schedules, click on the Work Preference
 icon. For resident schedules, click on the Block icon. For resident schedules, click on the Block  icon. icon.
- Locate the Infobox window and select a staff's name. There are three
text box fields in the Infobox window.
- Enter the pager or primary number in the top field, a secondary number (if needed)
in the middle field, and the email address in the bottom field. Emails entered in
the bottom field do not appear at Amion.com. It is used for features such as swapping
shifts online, submitting online requests, and receiving schedule-change notifications.
- Repeat the step above for each person in your staff list. Publish to Amion to
save changes.
- Click here
to learn how to enable paging at Amion.
Advanced information - use the Contact info
window:
Use the Contact info window if:
- you need to display additional contact information
- you need to enable text messaging to a cell phone or other messaging provider
- you need the email address to be visible at Amion
- specific numbers need to be private
- you prefer icons to appear in place of the numbers at Amion
- In the Infobox window, highlight a staff member and then click on the blue
Contact info... link above the top text box field.
- In the Contact info window, select the contact type in the drop-down
selector box, then type in the information. Click the
 icon to add number. Repeat for additional contact info.
- To enable text messaging to a cell phone or other messaging provider, click
on the grey pager icon that appears to the right of the cell number. Select the provider
from menu options. Once enabled, the grey pager icon turns green.

- To make a number private, select the number and to the left of the window,
click the
 icon to
turn into a icon to
turn into a  icon for
private mode. icon for
private mode.
- Use the up and down arrows to arrange the order the contact information appears
at Amion.
Import contact information:
If you have a lot of staff, you can import their contact information from Excel into
OnCall.
- Begin by exporting your staff names in OnCall into Excel. This way,
the names will be in the same order when you import back into OnCall.
- In OnCall, go to your Work Preference page. Then right-click on the Work Preference icon and select
Table - everyone listed down left. You'll see all your staff names listed on
the left-hand side.
- Make sure they are in the order you prefer. To alphabetize, go to Options /
Sort rows. Or to manual organize the names, click and drag the names up or down
to your desired list order.
- Go to Edit / Copy table text then open a spreadsheet in Excel and click
Paste.
- In Excel, delete the date columns in the spreadsheet, leaving only the column
of staff names. Next, add new columns for each contact type. For example, if you need
to list pagers, cells and email addresses, then make three columns with those labels.
Enter the staff contact information into the designated columns.
- Only one contact type can be imported at a time. Start with your staffs' primary
contact type. In our example, the pager numbers. Select all the pager number cells
for your staff (not the header, nor the staff names). Click CTRL-C to copy
the selected cells. Then head back to OnCall's Work Preference page. Select your first staff person and in the Infobox
window, click in the top text box field. Then click CTRL-V to paste. A
pop-up box appears asking Paste for multiple people? Click
Yes. Repeat the steps for the cell numbers, selecting the middle text box field
in the infobox window. For emails, select the bottom text box field.
Alternatively, numbers can be imported in the Contact info window instead of
the Infobox window. To do so, click on the blue Contact info.. link
in the Infobox window. In the Contact info window, select from the drop-down
selector the contact type you want to import. Then click CTRL-V to paste.
Here we discuss cell.
This page describes text message.
Here we discuss contact.
|
|