Make managing your staff's work and time off requests quick and easy. Let staff submit
requests directly at Amion.com. Import requests from Amion to your OnCall application.
Build schedules according to approved work requests.
Set up requests
- In OnCall, check that you have email addresses entered for your staff. If
not, learn to enter email
addresses.
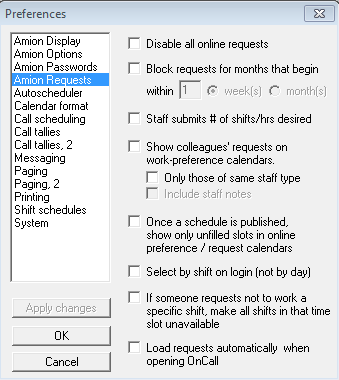
- Go to File in menu bar along the top and select Preferences / Amion Requests.
Enable the options that you desire.
- Go to your online Amion Administrator page. To get there, go to File / Publish
to Amion and click Admin. login.... Once on your Amion Administrator page,
locate the email section. Click on the drop-down box and select Work preference
forms. Select the month you want your staff to begin submitting requests for.
Enter a note message for additional instructions, such as a due date. Click Email
to send.
The email sent to your staff has your note and a link to their requests calendar at
Amion.com. Each person once on their Work Preference calendar page may add, review
and modify their work and time off requests. They may also set a personal password
at the bottom of the calendar to get back to their requests calendar via the smiley
face icon  , rather than using the email link.
To set a staff type to submit requests by day only, not by shift
- Open the schedule in OnCall. Go to the work preferences page, third icon
from the top left in the toolbar. Display the preferences in table view so that you
can see everyone listed down the left.
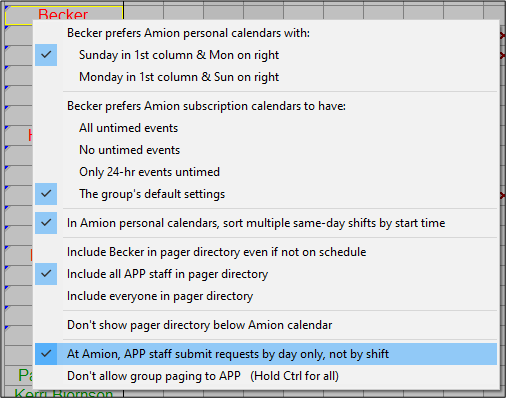
- Right click on a name. Then select the second to last button in the popup menu
that says At Amion, APP staff submit requests by day only, not by shift.
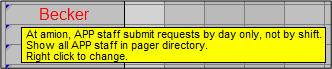
- The blue triangle in the upper left corner indicates the staff can submit requests
by day only, not by shift.
Use requests
- Retrieve - To retrieve submitted requests, open your OnCall
schedule. Click on the Work Preference
 icon
on the main toolbar. Then click the smiley face with sunglasses
icon
on the main toolbar. Then click the smiley face with sunglasses  icon to import NEW requests.
In addition, right-click on the smiley face icon to enable additional options
such automatic importing, flag new requests, import all requests for entire year,
and toggle between calendar and table views. New requests appear flagged with a small,
green triangle in the upper right corner.
If you do not have a Smiley face icon, or if you do not have the additional import
options, update your copy of OnCall.
ALTERNATIVELY - you may retrieve requests from your online Amion Administrator page.
Go to File / Publish to Amion and click Admin. login.... Click the link Get
staff requests…. Review the instructions for copying and pasting requests into
OnCall. The page also includes a link to view requests for first-come-first-served
prioritizing.
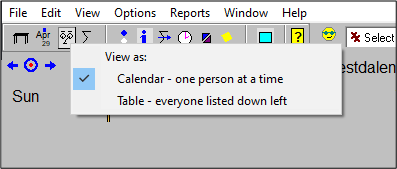
- Review - Review the requests in OnCall on the Work Preference
page. By default, you view one person’s requests at a time in calendar format. Use
the infobox to change staff calendars. To get an overview of all staffs' requests
at once, hold CTRL key and click on the Work Preference icon. Select table format.
Requests appear as the following:
- X An unavailable red X = The person is
unavailable to work the entire day.
- ✔ A green check with numbers = The number reflects
the number of shifts the person can work that day. To review the specific shift the
person cannot work, click on the drop-down box on the main toolbar. Select the option
Select by shift.
 A yellow diamond hollow note icon = Hover over the
note icon to read the message.
A yellow diamond hollow note icon = Hover over the
note icon to read the message.
- Approve/Deny - To deny requests, double-click on the red
X to remove it from the cell. To approve
requests, click the drop-down box on the main toolbar. Select Vac,
then double-click on the red X. The Vac
replaces the red X in the cell.
Right-click on a time off request or note in a cell to view more options. OnCall
does not automatically notify staff of their approved or denied requests.
You may customize the time off options in the drop-down box on the main toolbar. Go
to File / General Setup / Services. Enter the time off service name. Uncheck off
schedule box and click the Add button. The time off service appears below
in green text.
- Build - When building your schedule, your Infobox provides several
staffing list options. Select the green check ✔
in the Infobox toolbar to view only available staff. (Note: the Autoscheduler
pulls from this list only). Select the multiple horizontal line
 icon to view all staff. Unavailable staff appear in the
list, but have a red
X next to their name. Hover over the red X to learn the reason of their unavailability.
icon to view all staff. Unavailable staff appear in the
list, but have a red
X next to their name. Hover over the red X to learn the reason of their unavailability.
Schedules built prior to entering work preferences remain the same in the calendar.
However, a red X appears next to staff members
who requested that day off in the schedule.
To enable the time-slot proxy feature, go to File / Preferences and select "Amion Requests"
on the left. Turn on the checkbox that says "If someone requests not to work a specific shift, make all shifts in that time slot unavailable".
Go to the schedule and right click on a shift name. Turn off "Staff can ask to be unavailable for XXX",
where XXX is the name of the shift you selected. Hold the Ctrl key down when you select
"Staff can ask..." and it'll flip every shift to the new setting.
Let people choose only the shifts you want to use as proxies. Save to Amion and then
take a look at someone's request calendar. Select "by shift" in the drop-down above
the calendar and you should see only the services they can work.
Here we discuss vacation.
This page describes requests.
Here we discuss special requests.